As a cloud architect and hardware enthusiast, I’ve always admired efficiency. Not just in code or infrastructure, but in physical design too. That’s what led me down the path of building a Mini ITX PC: a system powerful enough for development, AI experiments, and gaming, yet compact enough to sit quietly on my desk.
It sounded elegant in theory. In practice, it became one of the most technically challenging but rewarding builds I’ve ever done. What started as a simple idea turned into weeks of research, troubleshooting, and a few humbling moments with stubborn hardware.
This is the story of how I built my Mini ITX machine, what went wrong along the way, and what I learned through it all.
The Vision
My previous workstation was built around a Ryzen 5 7500F with an RTX 4060 Ti in a mid-tower ATX case. It served me well, handling everything from Kubernetes clusters to AI model training. But it had one problem: it dominated my desk. The case was bulky, the cable management was mediocre, and I found myself wanting something more refined.
The goal for this new build was simple: a high-performance desktop that didn’t dominate my workspace. I wanted something quiet, powerful, minimalistic, and portable. I had built plenty of full-sized ATX systems before, but this time I wanted to push the limits of what’s possible in a small form factor.
The Mini ITX form factor forced me to think differently. Space was limited, thermals were tighter, and every component had to serve a purpose. Every decision came with a trade-off. This wasn’t just an upgrade; it was a complete rethinking of what a workstation could be.
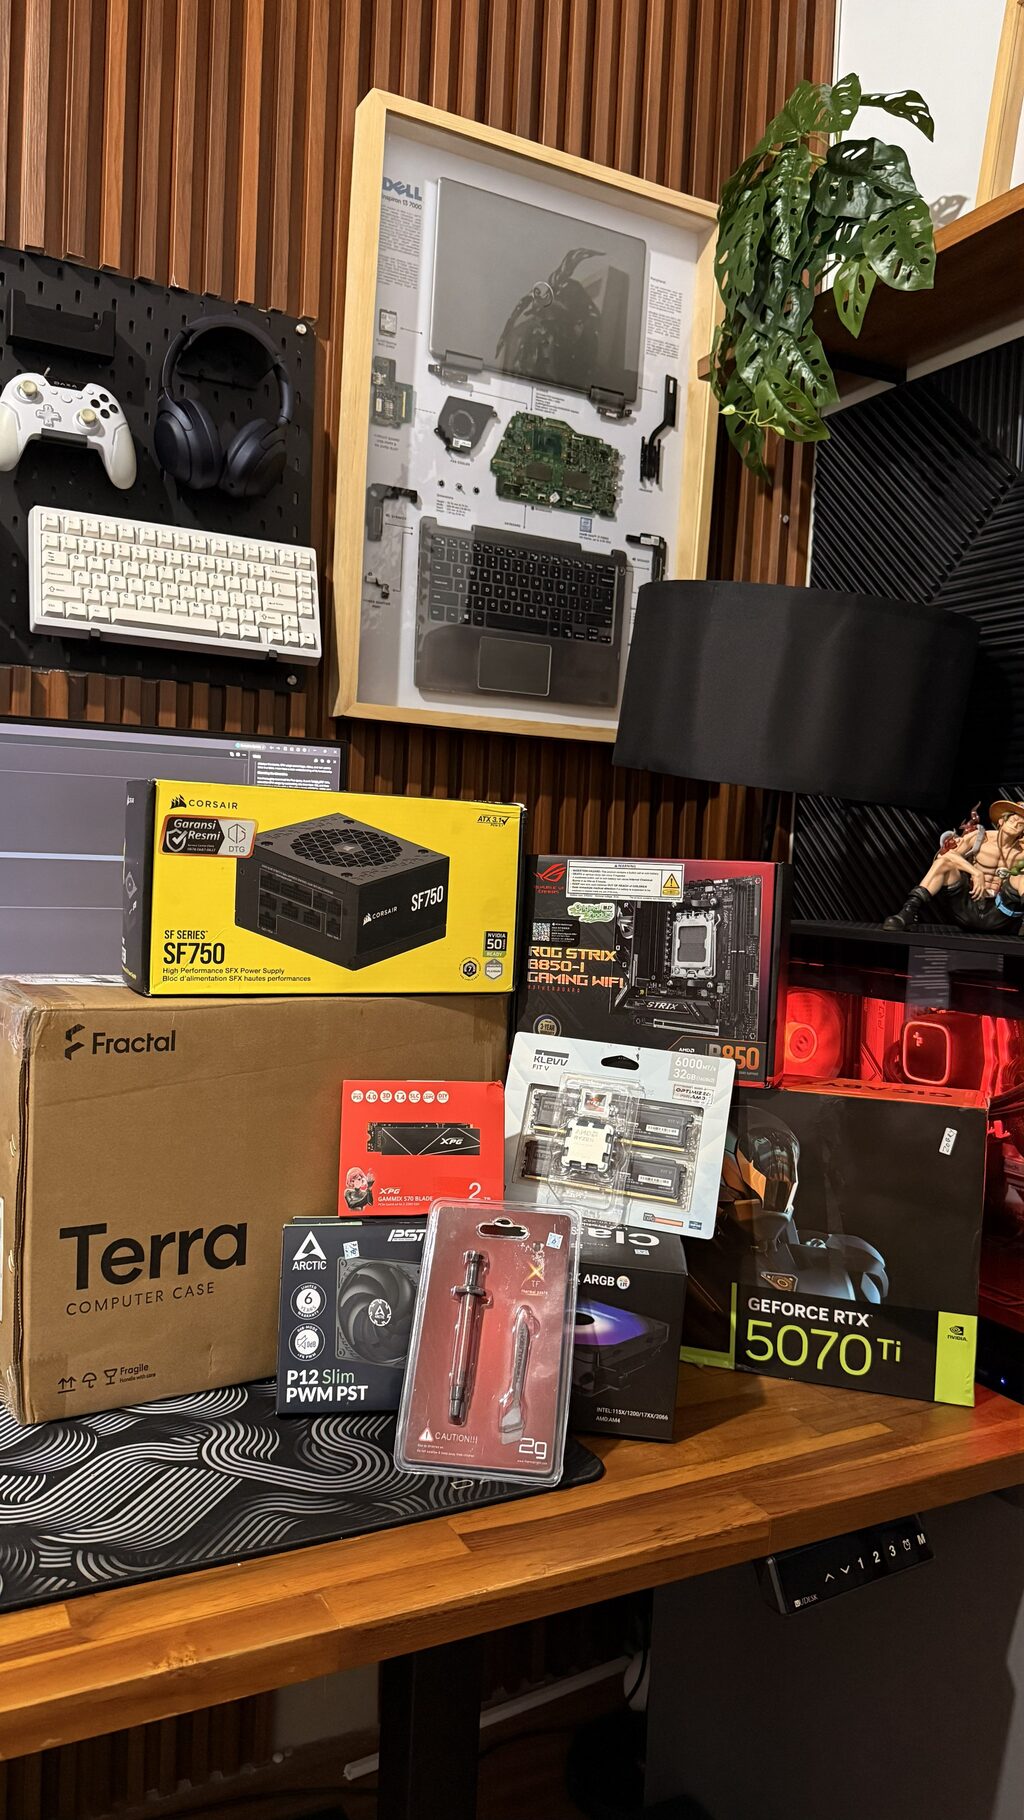
After weeks of planning, this was the final parts list I went with:
| Component | Model | Reason |
|---|---|---|
| CPU | AMD Ryzen 7 9700X | 8-core performance with great efficiency |
| Motherboard | ASUS ROG Strix B850-I Gaming Wi-Fi | Reliable BIOS, great VRM, solid ITX layout |
| GPU | RTX 5070 Ti | Strong for both gaming and AI workloads |
| CPU Cooler | Thermalright AXP120-X67 | Low profile, fits perfectly in tight spaces |
| Thermal Paste | Thermalright TFX | Good thermal conductivity and easy to apply |
| RAM | Klevv FIT V DDR5 6000 CL30 (32 GB) | Fast, low-profile memory ideal for ITX clearance |
| Storage | 1 TB NVMe Gen 4 SSD | Speed and simplicity |
| Case | Fractal Design Terra | Premium small form factor case |
| PSU | Corsair SF750 (SFX) | Compact but powerful enough for the setup |
| Fans | Arctic P12 Slim PWM | Efficient airflow in restricted space |
It looked perfect on paper. In reality, it was a test of patience and problem-solving.
The Challenges of Mini ITX Building
The first thing I realized about ITX builds is that you don’t get second chances. Every small mistake costs time. You can’t just move a cable or reseat a component without removing two others first.
But the biggest challenges weren’t about fitting parts together. They were about debugging, especially during the first boot.
The Debug LED Nightmare
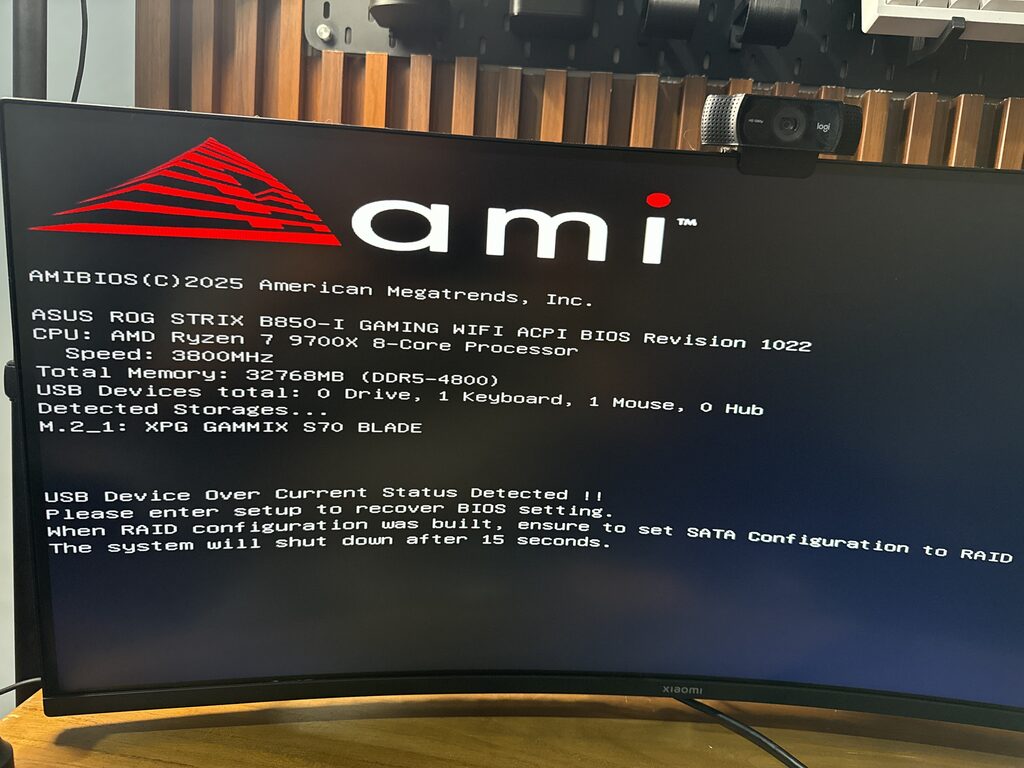
On the first power-on, I was expecting the usual satisfying BIOS screen. Instead, the motherboard’s debug LEDs lit up like a Christmas tree: orange, white, then nothing. No display. Just an orange light that stayed on.
I waited. Rebooted. Checked cables. Nothing.
That single orange light became my new nemesis. The ASUS Strix ITX board uses color codes to indicate which part of the system is failing during POST. Orange usually points to a DRAM issue.
I knew that on AMD’s AM5 platform, the motherboard can get stuck in a “memory training” loop, especially on first boot. When you enable EXPO profiles for DDR5, the system spends time testing voltage and timing combinations to find a stable configuration. Normally this takes a minute or two, but sometimes it can take much longer. So, I waited. And waited. But even after ten minutes, there was no change.
At this point, I suspected a more serious RAM issue. Removing the RAM on an ITX board with a low-profile cooler is not something you do quickly. The Thermalright AXP120 cooler blocks one of the RAM slots, which meant every test required removing the cooler, cleaning the thermal paste, and reapplying it again.
I did this more times than I’d like to admit. Eventually, I tried booting with just one RAM stick in the A2 slot. This seemed to bypass the DRAM error, but instead of booting to BIOS, the system immediately threw a new error, taking me to the next step of my troubleshooting nightmare.
The USB Overcurrent Culprit
Just when I thought I had solved the last of the boot issues, a new error appeared:
The message “USB Device Over Current Status Detected” is alarming. It means a USB port is drawing too much power, and the motherboard shuts down to protect itself. This can be caused by a faulty USB device, a short in a USB port, or a problem with the motherboard’s front panel connectors.
My heart sank. A short on the motherboard would be a disaster, requiring a full teardown. I started by unplugging every USB device. The error persisted. Then, I disconnected the case’s front panel USB-C and USB-A headers from the motherboard. On the next boot, the error was gone.
The Dreaded Bent Pins
However, the relief was short-lived. After reassembling everything, the system refused to boot again, returning to the dreaded orange DRAM light. Frustrated, I decided to dismantle the entire build. As I carefully removed the CPU, my heart sank. The motherboard’s AM5 socket pins on the top-left corner were visibly bent. It was clear I had installed the processor incorrectly at some point, causing irreparable damage.
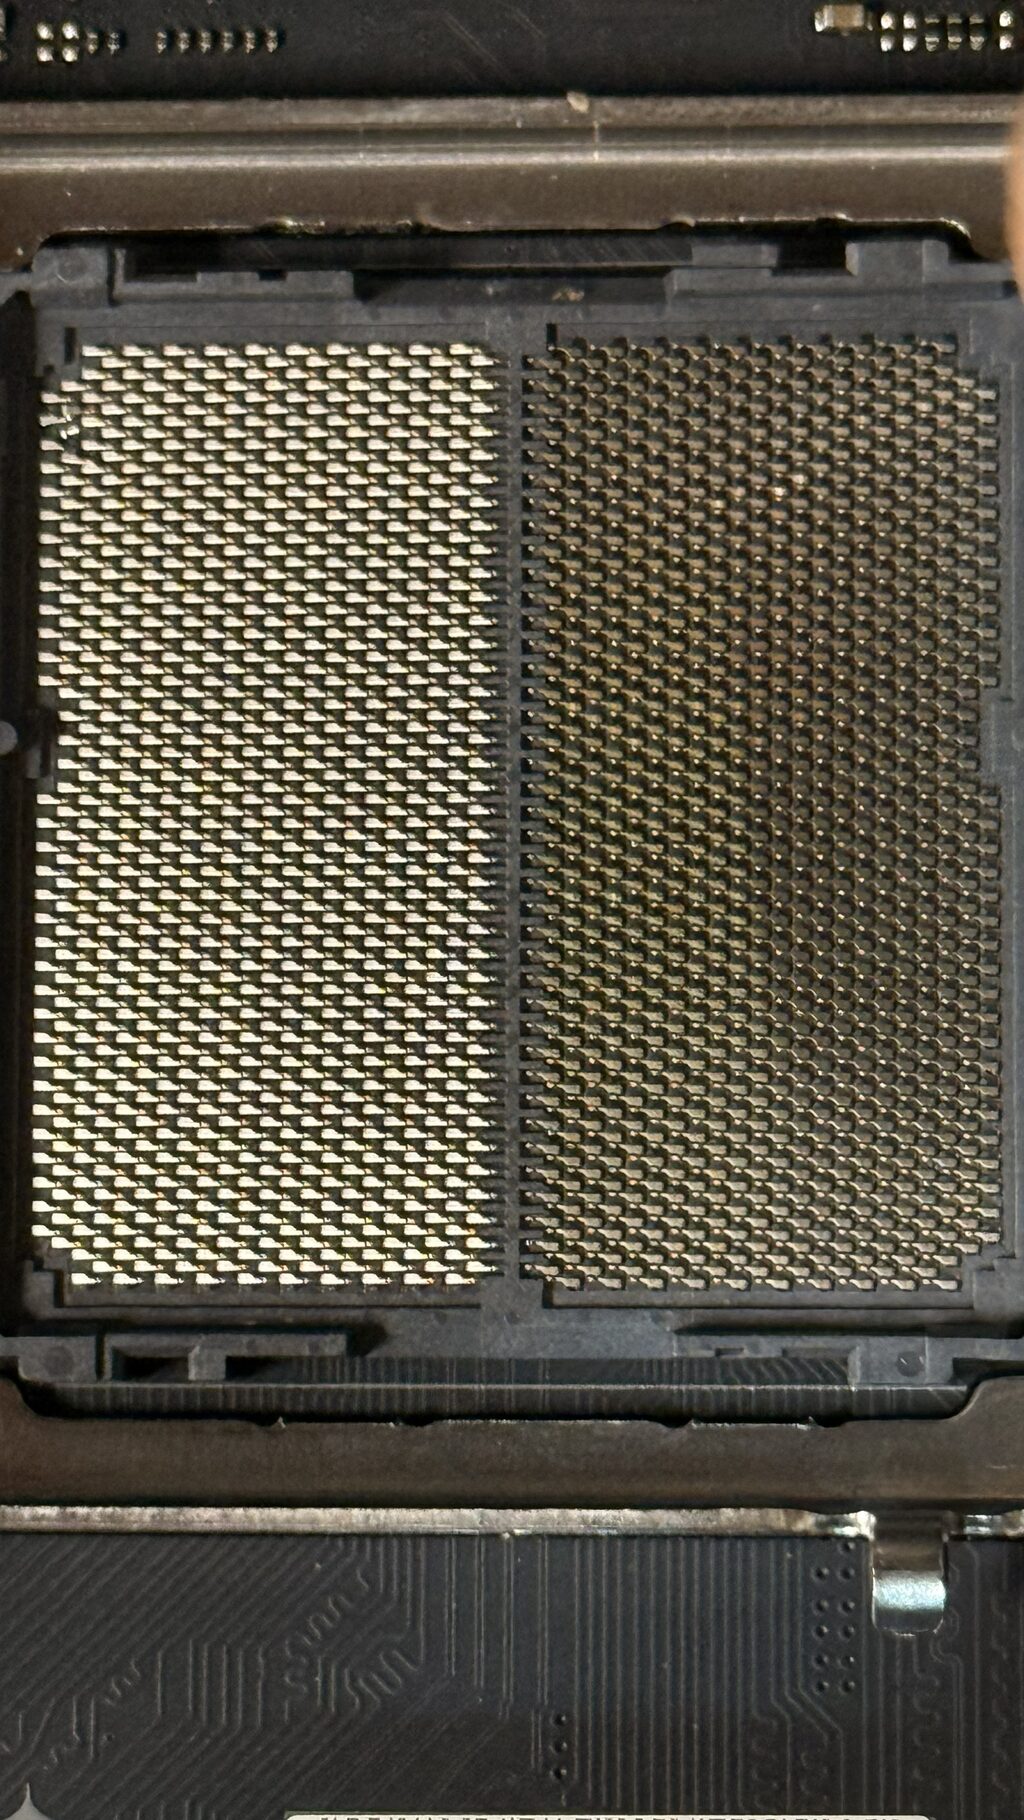
I tried to fix the bent pins with tweezers, but it was no use. The damage was too severe. My dream build was now a nightmare. I had no choice but to send the CPU and motherboard to a service center. What followed was a grueling month-long wait for repairs. When the components finally returned, I faced another challenge: the CPU had been replaced, and the motherboard’s BIOS needed to be reconfigured for the new processor, leading to another round of memory training and stability testing.
Tight Spaces and Thermal Headaches
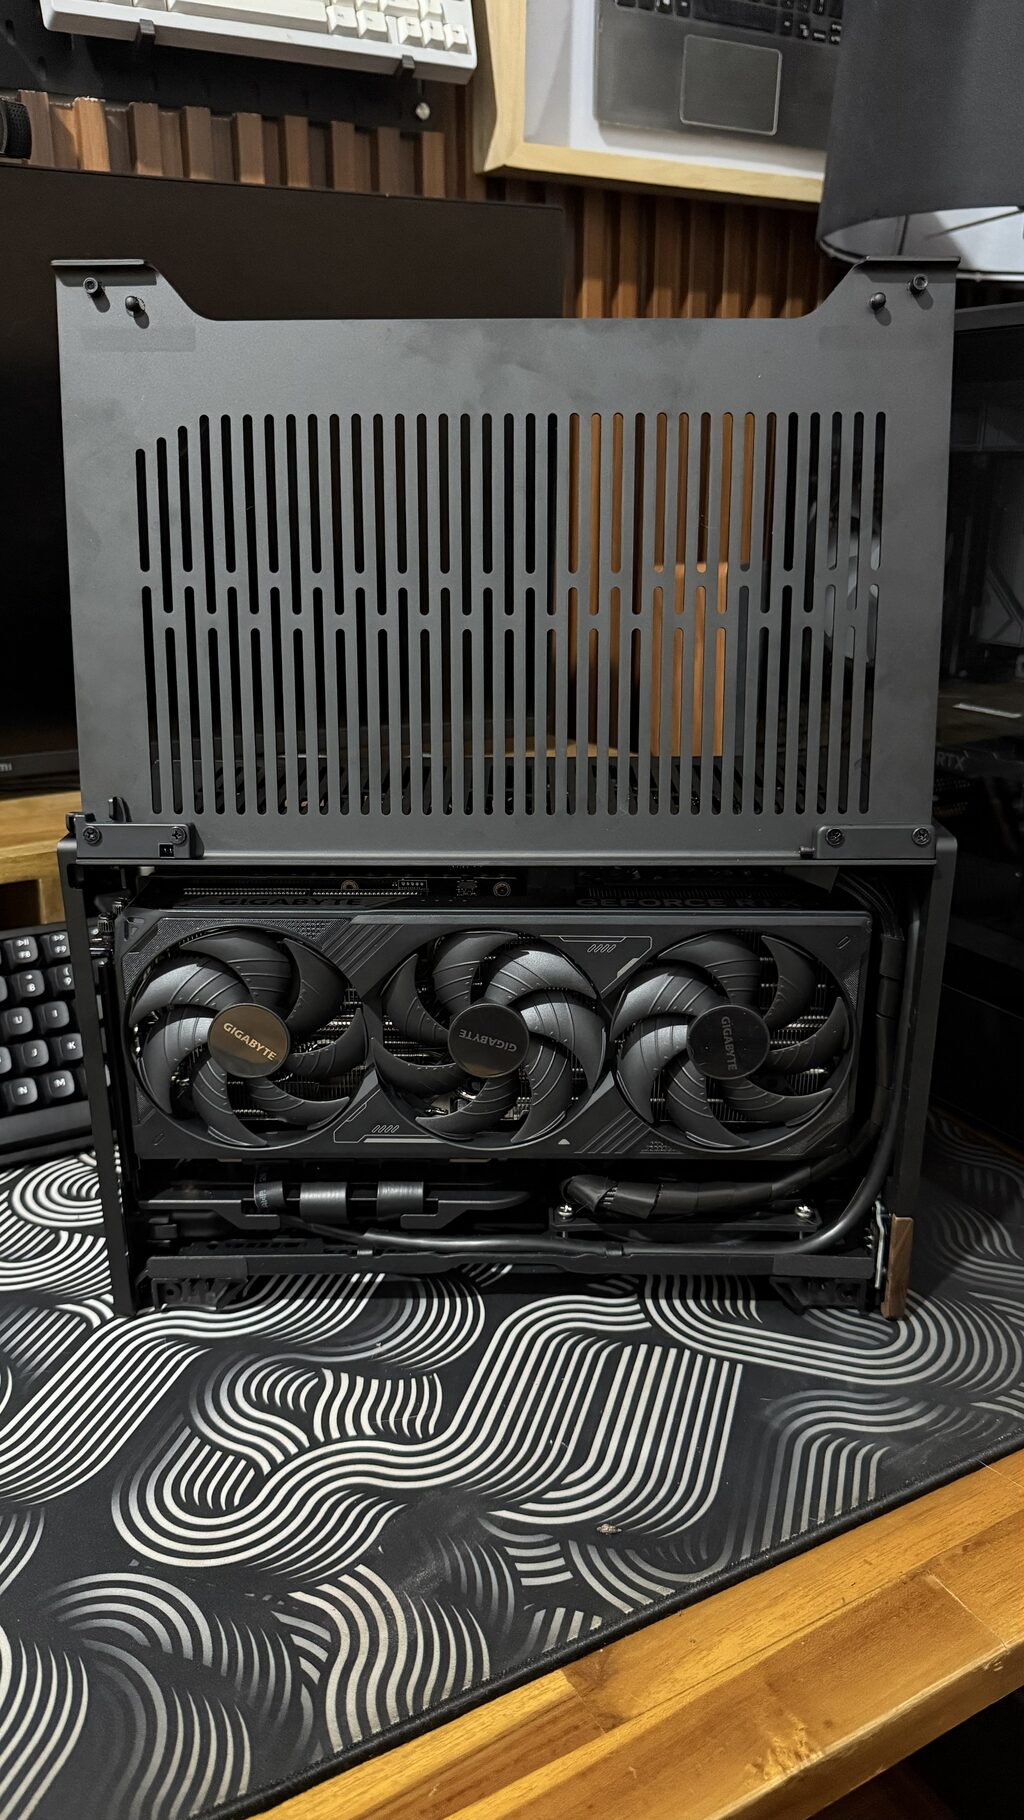
Fitting everything inside the Fractal Terra was both satisfying and painful. The case is one of the most beautiful ITX enclosures out there, but every millimeter counts.
The 77mm cooler height limit meant I couldn’t use my favorite tower coolers. The AXP120-X67 fit perfectly, but airflow became a challenge. With the GPU taking most of the space, the CPU fan had to pull air from the bottom and push it through the narrow top vents.
I used two slim Arctic P12 fans for intake at the bottom. Airflow in small cases isn’t about brute force; it’s about pressure balance. I made sure hot air had a clean escape path while keeping cables from obstructing the flow. After a few adjustments, it worked surprisingly well.
The CPU maxed out around 83°C under full load, and the GPU stayed below 70°C. For a system this small, that’s excellent.
Cable management was another nightmare. The short Corsair SF750 cables helped, but even then, routing them around the GPU shroud without bending too tightly required planning. I eventually ordered custom-length cables to improve airflow and aesthetics.
BIOS Reset and System Tuning
Once the system was stable enough to reach BIOS consistently, I faced another decision. The BIOS detected a new CPU and offered to reset all settings to default. Normally, that’s harmless. But on AMD boards, it means losing all memory training data, forcing the board to start the long boot process again.
I decided to reset anyway. It was worth doing cleanly. After the reset, I manually configured the RAM timings and fan curves. I also disabled any unnecessary features like onboard RGB to keep the system cool and quiet.
Then I updated the BIOS to the latest version, which fixed several AM5 stability issues. That update alone reduced my boot time from over 30 seconds to around 15.
Performance and Thermal Testing
Once everything was stable, it was time to see what this small machine could do. I ran several benchmarks and stress tests to ensure both performance and cooling were within expectations.
Cinebench R24: Around 18,900 points, roughly what you’d expect from a well-cooled Ryzen 7 9700X. Geekbench 6: About 14,500 in multi-core, close to desktop-class performance. 3DMark Time Spy: 19,200 points, excellent for a compact build. Blender render tests: Around 17% faster than my previous Ryzen 5 7500F build.
Under full load, the CPU hovered around 83°C and the GPU around 69°C. Idle temps stayed near 40°C. The system was almost silent under normal workloads, with fan noise only becoming noticeable during extended CPU stress tests.
Power draw peaked at around 420W under combined CPU and GPU load, which is well within the SF750’s limits.
Compared to my previous Ryzen 5 7500F build, the improvements were clear across the board. The jump from 6 cores to 8 cores, combined with moving from Zen 4 to Zen 5 architecture, brought noticeably better multi-threaded performance. The RTX 5070 Ti was a significant jump from the RTX 4060 Ti, especially for AI workloads and 4K gaming. But the most impressive part wasn’t just the raw performance gains; it was achieving them in such a dramatically smaller package with better thermals and lower noise levels.
What I Learned
This build taught me that working in a small form factor amplifies every mistake. Here are a few lessons that stuck with me:
- Be patient during first boot on AM5 systems. Memory training can take longer than you expect.
- Plan airflow before installation. Once everything’s in place, adjustments are painful.
- Cable management isn’t about looks in ITX builds; it’s about thermals and serviceability.
- Manual RAM tuning is more reliable than relying on EXPO profiles, especially early in the BIOS lifecycle.
- Don’t skip BIOS updates. On new platforms, firmware maturity makes a big difference.
- Always double-check CPU orientation and pin alignment. A moment of carelessness can lead to costly damage and significant delays.
- Know when to call in the professionals. Attempting to fix physically damaged components like bent CPU pins yourself can worsen the problem.
The End Result
After countless iterations and late-night troubleshooting sessions, I finally had a stable system that met all my goals. It was quiet, fast, and compact. It fit perfectly on my desk, right next to my monitor setup, without taking over the space.

More importantly, it felt uniquely mine. Every part, every cable, every fan orientation had been tuned and decided through trial, error, and problem-solving.
Coming from my previous Ryzen 5 7500F build, the difference was immediately noticeable. The new system is not only faster but also takes up a fraction of the desk space. What used to be a bulky mid-tower is now a compact cube that looks more like a premium audio component than a workstation. The noise levels dropped significantly too. My old build had a noticeable hum under load; this one stays whisper-quiet even during heavy compilation or rendering tasks.
The system now runs my personal projects, cloud lab experiments, and even local Kubernetes clusters without issue. It can compile code, train small AI models, and handle 4K gaming, all inside a case you can carry with one hand.
Reflections
This project reminded me that hardware building and software engineering share a common mindset: understanding constraints and designing within them.
This Mini ITX project taught me about balancing performance and thermal limits in physical space. It required patience, careful tuning, and respect for limitations.
Building something small yet powerful forces you to think more deeply about design trade-offs. You learn to value efficiency over excess and precision over brute force.
In the end, this Mini ITX build wasn’t just another PC. It was a personal lesson in persistence, engineering discipline, and the joy of creating something that performs beautifully within tight constraints.
System Summary
| Specification | Details |
|---|---|
| CPU | AMD Ryzen 7 9700X |
| GPU | NVIDIA RTX 5070 Ti |
| Motherboard | ASUS ROG Strix B850-I |
| RAM | 32 GB DDR5 6000 CL30 |
| Cooler | Thermalright AXP120-X67 |
| Storage | 1 TB NVMe Gen 4 |
| Case | Fractal Design Terra |
| PSU | Corsair SF750 |
| Fans | Arctic P12 Slim PWM |
Key Performance Stats
| Metric | Result |
|---|---|
| Boot Time | ~15 seconds |
| CPU Temperature (Idle / Load) | 40°C / 83°C |
| GPU Temperature (Idle / Load) | 39°C / 69°C |
| Power Draw (Idle / Load) | 65W / 420W |
| Noise Level | 26 dB at idle |
Closing Thoughts
This Mini ITX build taught me how to make compact systems breathe under pressure.
It’s a reminder that in both software and hardware, great design happens when you embrace constraints instead of fighting them. The tighter the space, the more creative you need to be.
And that’s exactly why this small machine on my desk isn’t just another PC build. It’s a reflection of everything I’ve learned as an engineer: balance, patience, and the satisfaction of seeing complexity work in harmony.