I needed a way to access all my servers—VNC, RDP, and SSH—from a single place, without installing a bunch of client software on every device I use. That’s when I discovered Apache Guacamole, a clientless HTML5 web-based remote desktop gateway that runs right in a web browser. It has completely changed how I manage remote connections.
What I love about Guacamole is that it’s completely clientless. It supports multiple protocols, centralizing access to all my machines. Plus, it has great features for teams, like session recording, mobile support, and integrations for security like HTTPS and MFA.
Let me walk you through how I set it up.
The Architecture
Guacamole consists of two main components that work together:
- guacamole-server: This is the native, server-side part that includes the
guacdproxy daemon and all the libraries for handling protocols like VNC, RDP, and SSH. - guacamole-client: This is the web application, served by a container like Apache Tomcat, that provides the HTML5 frontend you interact with in your browser.
Prerequisites
Before I got started, I made sure my server was ready. You’ll need:
- Ubuntu 20.04+ (or another Debian-based Linux)
- Root or sudo access
- At least 2GB of RAM
- Port 8080 open on your firewall (or whichever port you choose)
Part 1: Install Build Dependencies
First, I had to install the build dependencies, since the Guacamole server needs to be built from source.
sudo apt update
sudo apt install -y \
  gcc g++ libcairo2-dev libjpeg-turbo8-dev libpng-dev \
  libtool-bin libossp-uuid-dev \
  libavcodec-dev libavutil-dev libswscale-dev \
  freerdp2-dev libpango1.0-dev \
  libssh2-1-dev libvncserver-dev libtelnet-dev \
  libssl-dev libvorbis-dev libwebp-dev
Dependency Breakdown
- libcairo2-dev: Graphics rendering
- libjpeg-turbo8-dev, libpng-dev: Image compression
- freerdp2-dev: RDP protocol support
- libvncserver-dev: VNC protocol support
- libssh2-1-dev: SSH protocol support
- libtelnet-dev: Telnet support
Part 2: Build and Install Guacamole Server
Next, I downloaded and built the Guacamole server itself. I always check for the latest version on their releases page first.
Download Source
# Check latest version at: https://guacamole.apache.org/releases/
GUAC_VERSION="1.5.4"

cd /tmp
wget https://downloads.apache.org/guacamole/${GUAC_VERSION}/source/guacamole-server-${GUAC_VERSION}.tar.gz
tar -xzf guacamole-server-${GUAC_VERSION}.tar.gz
cd guacamole-server-${GUAC_VERSION}
Configure Build
I ran the configure script to prepare the build.
./configure --with-init-dir=/etc/init.dIt’s important to check the output to ensure all the protocols you need are enabled.
------------------------------------------------
guacamole-server version 1.5.4
------------------------------------------------

   Library status:

     freerdp2 ............ yes
     pango ............... yes
     libavcodec .......... yes
     libavformat ......... yes
     libavutil ........... yes
     libssh2 ............. yes
     libssl .............. yes
     libvncserver ........ yes
     libvorbis ........... yes
     libwebp ............. yes

   Protocol support:

      Kubernetes .... yes
      RDP ........... yes
      SSH ........... yes
      Telnet ........ yes
      VNC ........... yes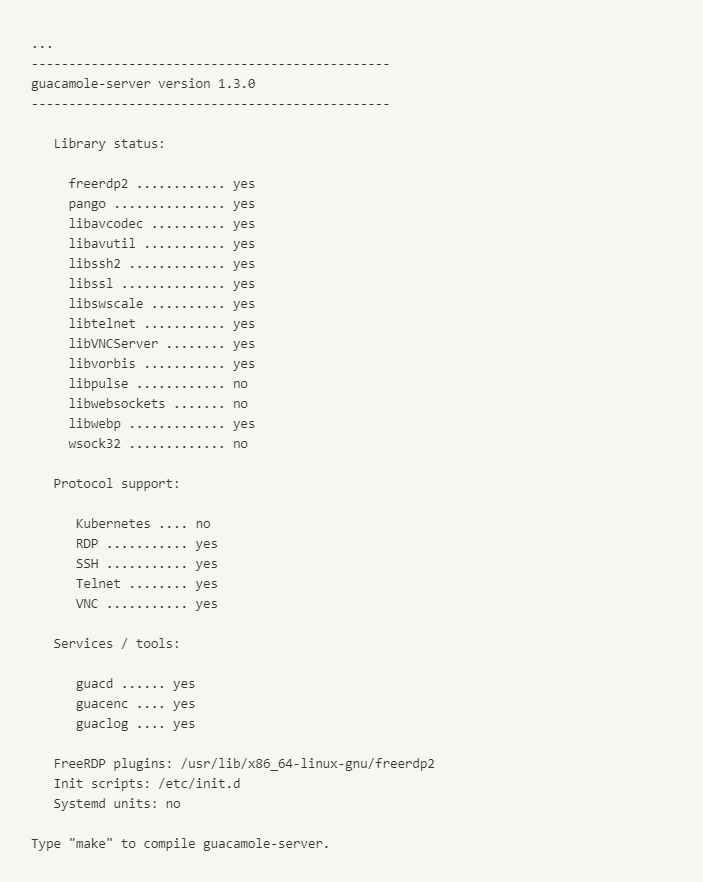
Build and Install
Then, I compiled and installed it.
make
sudo make install
And finally, updated the shared library cache.
sudo ldconfigPart 3: Configure Guacamole Daemon
With the server built, the next step was to get the guacd daemon running.
sudo systemctl daemon-reload
sudo systemctl start guacd
sudo systemctl enable guacd
A quick status check confirms it’s active.
sudo systemctl status guacdPart 4: Install Apache Tomcat
For the web client, I used Apache Tomcat.
sudo apt install -y tomcat9 tomcat9-admin tomcat9-common tomcat9-userI made sure to open the firewall port and verify Tomcat was running by visiting http://your-server-ip:8080.
sudo ufw allow 8080/tcp
sudo systemctl status tomcat9
Part 5: Install Guacamole Client
Now to install the Guacamole web application itself.
I created a configuration directory and downloaded the .war file.
sudo mkdir -p /etc/guacamole
GUAC_VERSION="1.5.4"
sudo wget https://downloads.apache.org/guacamole/${GUAC_VERSION}/binary/guacamole-${GUAC_VERSION}.war \
  -O /etc/guacamole/guacamole.war
Then, I symlinked it into Tomcat’s webapps directory and restarted the service.
sudo ln -s /etc/guacamole/guacamole.war /var/lib/tomcat9/webapps/
sudo systemctl restart tomcat9
After about 30 seconds, I could see the guacamole/ directory in ls -l /var/lib/tomcat9/webapps/, confirming it was deployed.
Part 6: Configure Guacamole
Next, I needed to tell Tomcat where to find the Guacamole configuration files.
echo "GUACAMOLE_HOME=/etc/guacamole" | sudo tee -a /etc/default/tomcat9I created the main guacamole.properties file to connect the web app to the guacd daemon and define the authentication method.
sudo nano /etc/guacamole/guacamole.properties# guacamole.properties
# Guacd connection
guacd-hostname: localhost
guacd-port: 4822
# Authentication provider
auth-provider: net.sourceforge.guacamole.net.basic.BasicFileAuthenticationProvider
# Basic properties
basic-user-mapping: /etc/guacamole/user-mapping.xml
I also created the extension and library directories and linked them for Tomcat.
sudo mkdir -p /etc/guacamole/{extensions,lib}
sudo ln -s /etc/guacamole /usr/share/tomcat9/.guacamole
Part 7: Configure User Authentication
For this initial setup, I used the basic file-based authentication. First, I generated an MD5 hash for my password.
echo -n 'yourpassword' | openssl md5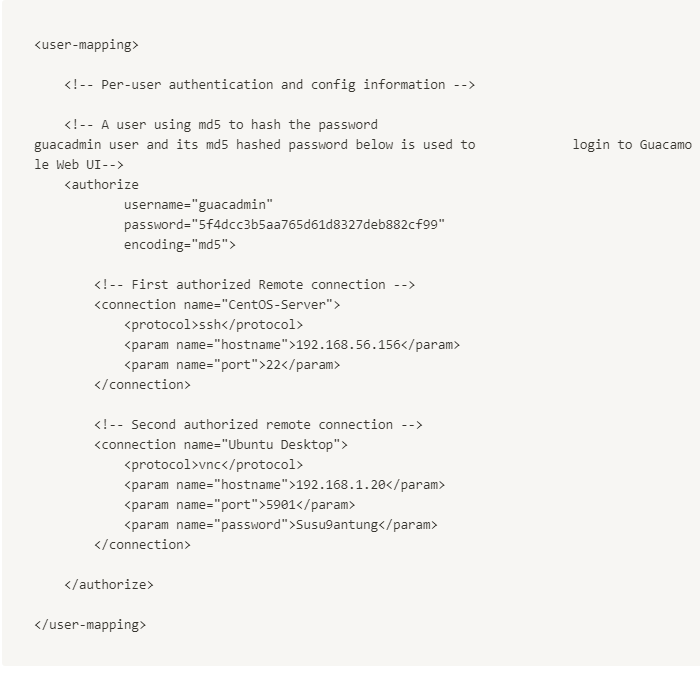
Then, I created the user-mapping.xml file to define my admin user and the remote connections I wanted to access.
sudo nano /etc/guacamole/user-mapping.xml<user-mapping>
<!-- Admin user -->
<authorize
username="admin"
password="5f4dcc3b5aa765d61d8327deb882cf99"
encoding="md5">
<!-- VNC Connection -->
<connection name="Ubuntu Desktop VNC">
<protocol>vnc</protocol>
<param name="hostname">192.168.1.100</param>
<param name="port">5901</param>
<param name="password">vncpassword</param>
</connection>
<!-- RDP Connection -->
<connection name="Windows Server RDP">
<protocol>rdp</protocol>
<param name="hostname">192.168.1.200</param>
<param name="port">3389</param>
<param name="username">Administrator</param>
<param name="password">rdppassword</param>
<param name="ignore-cert">true</param>
</connection>
<!-- SSH Connection -->
<connection name="Linux Server SSH">
<protocol>ssh</protocol>
<param name="hostname">192.168.1.50</param>
<param name="port">22</param>
<param name="username">ubuntu</param>
<param name="password">sshpassword</param>
</connection>
</authorize>
</user-mapping>Finally, I restarted both services to apply the changes.
sudo systemctl restart tomcat9
sudo systemctl restart guacd
Part 8: Access Guacamole
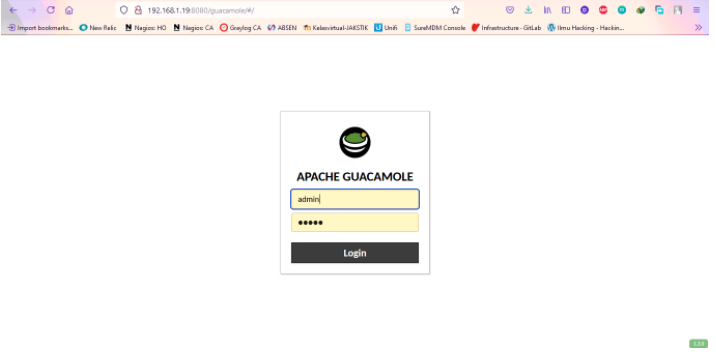
With everything configured, I could now access the web interface at http://your-server-ip:8080/guacamole and log in with my credentials.
Part 9: Configure VNC on a Remote Client
To test the VNC connection, I set up a TigerVNC server on a remote Ubuntu Desktop. This involved installing the VNC server and some GNOME components.
sudo apt install -y tigervnc-standalone-server gnome-panel gnome-settings-daemon metacity nautilus gnome-terminalI configured the ~/.vnc/xstartup file to launch a basic desktop environment.
mkdir -p ~/.vnc
nano ~/.vnc/xstartup
#!/bin/bash
export XKL_XMODMAP_DISABLE=1
unset SESSION_MANAGER
unset DBUS_SESSION_BUS_ADDRESS
[ -x /etc/vnc/xstartup ] && exec /etc/vnc/xstartup
[ -r $HOME/.Xresources ] && xrdb $HOME/.Xresources
vncconfig -iconic &
gnome-panel &
gnome-settings-daemon &
metacity &
nautilus &
gnome-terminal &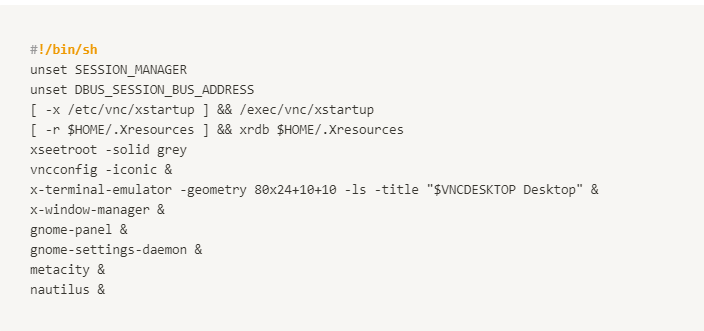
After making the script executable (chmod +x ~/.vnc/xstartup), I set a VNC password with vncpasswd and started the server on display :1, which corresponds to port 5901.
vncserver :1 -geometry 1920x1080 -depth 24For convenience, I also set up a systemd service (/etc/systemd/system/vncserver@.service) to auto-start the VNC server on boot.
Taking it to Production
For a real-world setup, I wouldn’t just leave it running on HTTP. I put it behind an Nginx reverse proxy with HTTPS. Also, for user authentication, the basic XML file is fine for testing, but for production, I switched to a PostgreSQL database for better security and scalability.
Using a database involves installing the PostgreSQL JDBC extension for Guacamole, creating a database and user, and updating guacamole.properties to point to it instead of the XML file.
Things I Ran Into
During my setup, I hit a few snags. If you see a blank page after logging in, the first place I’d check is the Tomcat logs (sudo tail -f /var/log/tomcat9/catalina.out). If you can’t connect to a remote desktop, make sure guacd is running and check its logs (sudo journalctl -u guacd -f). Connection issues are often simple firewall or VNC/RDP server configuration problems.
Final Thoughts
Through this process, I learned a few key things for a production-ready Guacamole setup. Security is paramount, so always use HTTPS, strong passwords (ideally with MFA), and a proper database for authentication instead of the XML file. The architecture is straightforward: guacd is the proxy daemon that does the heavy lifting, and Tomcat serves the web UI. By centralizing access this way, I’ve simplified my remote access management immensely, and the ability to record sessions is a huge plus for auditing.